Lesson 20: If, Else, Ifelse
If our Census data example above, it was stated that education codes 0-9 all corresponded to having no college education at all. For instance, 9 means high school graduate, while 6 means schooling through the 10th grade. (Of course, few if any programmers and engineers have educational attainment level below college, but this dataset was extracted from the general data.) 13 means a bachelor’s degree.
Suppose we wish to color-code the wage-age graph in an earlier lesson by educational attainment. Let’s amalgamate all codes under 13, giving them the code 12.
The straightforward but overly complicated, potentially slower way would be this:
> head(pe$educ,15)
 [1] 13  9  9 11 11 11 12 11 14  9 12 13 12 13  6
> for (i in 1:nrow(pe)) {
+    if (pe$educ[i] < 13) pe$educ[i] <- 12
+ }
> head(pe$educ,15)
 [1] 13 12 12 12 12 12 12 12 14 12 12 13 12 13 12
For pedagogical clarity, I’ve inserted “before and after” code, using
head, to show the educ did indeed change where it should.
The if statement works pretty much like the word “if” in English.
First i will be set to 1 in the loop, so R will test whether
pe$educ[1] is less than 13. If so, it will reset that element to
12; otherwise, do nothing. Then it will do the same for i equal to
2, and so on. You can see above that, for instance, pe$educ[2] did
indeed change from 9 to 12.
But there is a slicker (and actually more standard) way to do this (re-read the data file before running this, so as to be sure the code worked):
> edu <- pe$educ
> pe$educ <- ifelse(edu < 13,12,edu)
Tip: Once again, we’ve broken what could have been one line into two, for clarity.
Now how did that work? As you see above, R’s ifelse function
has three arguments, and its return value is a new vector, that in this
case we’ve reassigned to pe$educ. Here, edu < 12 produces a vector
of TRUEs and FALSEs. For each TRUE, we set the corresponding element of
the output to 12; for each FALSE, we set the corresponding element of
the output to the corresponding element of edu. That’s exactly what
we want to happen.
So, we can now produce the desired graph:
> plot(pe$age,pe$wageinc,col=edu)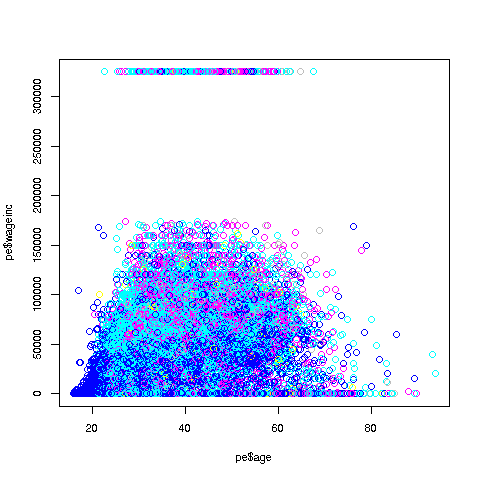
By the way, an ordinary if can be paired with else too. For
example, say we need to set y to either -1 or 1, depending on
whether x is less than 3. We could write
if (x < 3) y <- -1 else y <- 1One more important point: Using ifelse instead of a loop in the
above example is termed vectorization. The name comes from the fact
that ifelse operates on vectors, while in the loop we operate on one
individual element at a time.
Vectorized code is typically much more compact than loop-based code, as was the case here. In some cases, though certainly not all, the vectorized version will be much faster.
By the way, note the remark above, ”ifelse operates on vectors.”
Let’s revisit the above statement with this point in mind.
> pe$educ <- ifelse(edu < 13,12,edu)It would be helpful to keep in mind that both the 13 and the 12 will be
recycled, as expained before. The edu vector is 20090 elements
long, so in order to be compared on an element-to-element basis, the 13
has to be recycled to a vector consisting of 20090 elements that are
each 13. The same holds for the 12.
Here’s another example. Say we wish to recode the Nile data to a
new vector nile, with values 1, 2 and 3, for the cases in which the
value is less than 800, between 800 and 1150 inclusive, or greater than
- We could do this:
> nile <- ifelse(Nile > 1150,3,2)
> nile <- ifelse(Nile < 800,1,nile)
# check it
> table(nile)
nile
 1  2  3
26 62 12
After the first call to ifelse, the vector nile (not Nile;
variable names etc. are case-sensitive) consists of 2s and 3s. The 3s
are right, but the 2s need further work, hence the second call.
But let’s look closely at the second call, to review some things we’ve seen before:
-
The expression
Nile > 1150evaluates to a vector of 100 TRUEs and FALSEs. -
The singleton value 800 is then recycled to one hundred 800s, to set up the
<. Let’s call the result of that<operationw. -
Then
ifelse(Nile < 800,1,nile)says, “For each element in the vector w that is TRUE, write down a 1; for each element that is FALSE, write down whatever the corresponding value is innile.”
Well, congratulations! With for and now ifelse, you’ve really
gotten into the programming business. We’ll be using them a lot in the
coming lessons.
Your Turn: Write a
forloop version of theNileexample above.